Showing posts with label apoxie sculpt. Show all posts

January 1, 2012

Starting back in the studio again...

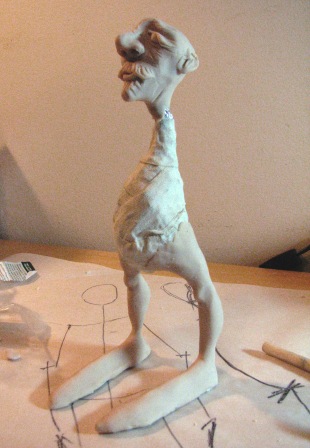
I started working in the studio again. Thinking tall thin doll... 

 I can't remember how many times I scraped the face off and started over. I wanted something simple like my paper clay dolls. After numerous attempts I ended up with this demon like head. That was not the direction I wanted but oh well... I set the head in the oven and will use it another time.

 I tried a simpler featured head.
And then I went to my mom's to celebrate New Year's Eve with a couple competitive games of Spite and Malice and some treats as we watched a movie and waited for the ball drop. We never made it to the Ball Drop both of us were tired. I came home and found out that my doll must have had a party of her own. She was on the floor with her knees all bent and broken... I guess now is not her time.
.

 So I straightened her legs and whimpered at her poor brokeness and then cuddled on the couch with my kitty and watched the drop before nodding off. Out with the old.
And in with the new!


So this morning I thought it was going to be a short and squat day. I had a little guy in my head that wanted out. So I began again. I made a head that really didn't look like the one in my head, but I decided to go with the flow. 


Then I decided to start a squat little body. I used a stick support while I got his balance right. Taped up a foil ball, added a wire through his body for legs, taped some super strong cardboard to the foot wires and taped it up. Hockey tape is my tape of choice. 
I tried his head on for size (hee, hee) and started adding clay to his feet and legs.


Not sure exactly what he wants to be yet... I'll let him stand around arm less for a while and see what comes to me.
Happy New Year everyone, be sure to make your creative endeavours happy experiments. I believe there is a plan, it will reveal itself when it's ready. I'll just be sure to be open and jump in with both feet and bells on!
Bring it on 2012!

July 23, 2011

Work on Red continues

We're in the midst of a heat wave, like much of the U.S. I guess, so I haven't been working on Red much. She's got some hands and feet, her armature has been added and her pose set with apoxie. I found a wood base and drilled a hole for the armature support. A brass rod runs through her left leg and out the bottom of her foot. I'm not sure if she'll have shoes or be barefoot so I sculpted the feet.


I've also done the face up. I use soft pastels for much of that and use a bit of acrylic for the stronger elements like her eyes. She still needs a varnish and some lashes. I usually paint them on but I think she needs a fine fringe of lashes. Still trying a few things out. Fake eyelashes don't do it for me.  I'm still not sure if she'll be blonde or brunette.

July 3, 2011

Red: A work in progress

Since the movie released in March I haven't been able to get this idea our of my head. So I've finally started my version of Red Riding Hood. I hope I can capture the image I have in my head. I rarely start out with drawings, they never seem to capture what I have trapped in my thoughts anyways. I look for images of what I'm thinking I might want the expression to be, or the pose, and even the clothes and colours I want to use. I use them for inspiration while I work, they can be illustrations, photos, movie posters, etc.
So here is Red's head. So far. Might live with it for a while before I bake it. I take photos in different positions, by looking at the photos instead of the head, I may see things I haven't seen working so close to it.

I've decided to paint the eyes in, instead of using glass. I want her to be looking behind her and the glass eyes I have a flat back so that's not possible. They're the wrong size anyway. I want to work a bit smaller for this one as it will be a full body pose, full of movement I hope. I'm really hoping I can capture the fear. It's hard to tell until I start painting in the features. Anyway's, here's the progress pics so far.


July 1, 2011

Davy's Secret: The Hair Episode

Ok, finally got down to getting this post up. I've been working on Davy's hair. I've once again used apoxie sculpt, setting it down in layers. I'll need to clean it up a bit with a knife when it's completely set up. I like the gray, so I'll keep it. Looks more like Sam Elliott now, who I was thinking of when I sculpted the head.
I'll add a wash of black and blue to give it some depth and then maybe a coat of light gray. We'll see.

May 29, 2011

Davy's WIP continues today

After a busy day shopping with mom I finally sat down to work on the rest of the Kracken. I added colour and positioned his last four tentacles, propped them up to set and added his head. Now it just needs to set up before I get back in again. Maybe tomorrow night.

May 28, 2011

Davy's Busy Day More WIP

After the undercoat of navy, I've built up a green layer, looks kind of algae like now.  Actually the real thing looks better than the photos. This is  many slow layers of paint, and sponging away. It builds up in some spots more than others and gives it a more natural ageing appearance. Of course then I have to go back and shine up the bits I want to glimmer, like some gems and coins and pearls. It's looking better now, not so souvenir shoppy with all the shells. More old and undersea crusted like I imagined.
 As I said, not so much so in the photos.


Here you can see that I have to prop up my tentacles as I attach them to the head of the Kraaken. I decided to give them a quick and dirty under paint before attaching them because there would be no way I could do them justice once attached. That way I just need to paint the attachment bits and the head and touch up the tentacley bits once I get the head of the Kraaken underway.


I must say it's been a rather full day with this one. Only a short break for lunch, dinner and a sip or two of my favourite vintage before I was off and at 'em again. I'll let the piece set up over night and get cracken on the rest of my Kraaken... snort... I know... but come on who could resist the pun!

May 5, 2011

The Wonderful World of Scott Radke

Another wonderful doll artist to feature! Enter the wonderfully dark world of Scott Radke who also works with apoxie sculpt. I am so intrigued with marionettes I couldn't help but feature some of Scott's work.


Be sure to stop by all the artists involved in Kerin Gale's blog hopping tour for her new book Inspired Remnants, Curious Dreams. Today's official stop on the tour is with Seth Apter, The Altered Page http://thealteredpage.blogspot.com/

May 4, 2011

Another wonderful Apoxie Art Doll

Over the past few days and over the next couple of weeks I will try to feature artists who use apoxie in their work. This is all part of a blog hopping book tour that is happening because of a wonderful book by Kerin Gale. Inspired Remnants, Curious Dreams is on tour!! See my previous posts to find the list of sites you can visit and be sure and stop by Kerin's blog for more inspiration.

Today I want to showcase another wonderful Doll artist on etsy who uses apoxie sculpt in her work.

Secret Apothecary is an original handmade art doll bust by Jessica Hamilton. She is one of a kind and has been entirely hand sculpted in polymer clay and apoxie sculpt. She stands at 11.3 inches (28.7 cm) and is over two pounds! The base of the bust features artist signature and title of the piece, "Secret Apothecary."

The bust features a secret compartment at the front hidden by a decorative wheel face plate. Here you can hide special notes, secrets and treasures. She'll keep them safe for you. The compartment is a recycled candy tin measuring 3" wide by .75" in depth (7.5cm by 2cm).

The face is entirely sculpted in polymer clay. She has large amber hazel eyes--the centerpiece of a sad, wistful countenance. Her features have been colored with artist pigments. Her bright red hair is fine mohair.

She wears a hand-pieced leather and vinyl hat on her head. The hat features a vintage watch band strap that nestles around her chin. The hat is not removable.

The bust is highly ornamented and costumed in miniature hand dyed blown glass bottles (filled with colored papers), faceted crystals, tarnished chains and metal rings, hand dyed vintage laces and trims, paper pulp lace, vintage netting and designer leather. The face plate for the secret compartment has been hand sculpted and painted to resemble an old wheel or window frame.The inside of the compartment has been lined and sealed with acid free archival fine Italian paper.

Thread Painting Cat Portrait